How to Create a DIY Smart Home Hub with Raspberry Pi
In recent years, the smart home phenomenon has swept across the globe, offering unprecedented convenience, security, and energy efficiency to homeowners. With a variety of devices that can automate daily tasks and provide real-time monitoring and control, the idea of a smart home has become more appealing than ever. But how do you bring this futuristic technology into your own home without breaking the bank? The answer lies in building your own DIY smart home hub using a Raspberry Pi.
This article will walk you through the process, empowering you to create a cost-effective, fully customisable smart home hub that can manage all your connected devices seamlessly.
Understanding the Basics
A smart home hub serves as the central command center for your smart devices, allowing you to control everything from lights and thermostats to security cameras and sensors. By integrating these devices into a single hub, you can streamline your home automation experience, making it easier to manage your household and enhance your quality of life. The hub communicates with your smart devices using various protocols like Zigbee, Z-Wave or Wi-Fi, enabling you to create complex automations and routines that respond to your needs.
Why choose Raspberry Pi for your DIY smart home hub? The answer is simple: Raspberry Pi is an affordable, versatile, and powerful single-board computer that is perfect for home automation projects. With its low cost and open-source nature, Raspberry Pi provides a flexible platform that can be tailored to your specific requirements. Other benefits are its extensive community support and wide range of compatible accessories make it an ideal choice for both beginners and experienced hobbyists.
Gathering Materials and Tools
Raspberry Pi Model Recommendations
When selecting the ideal Raspberry Pi model for your DIY smart home hub, the Raspberry Pi 4 is a highly recommended choice due to its superior performance and versatility. Equipped with a powerful 1.5 GHz quad-core ARM Cortex-A72 processor and up to 8GB of RAM, it can handle multiple smart home devices and automation tasks with ease. Additionally, its dual-band Wi-Fi, Bluetooth 5.0, and multiple USB ports provide ample connectivity options for integrating various peripherals.
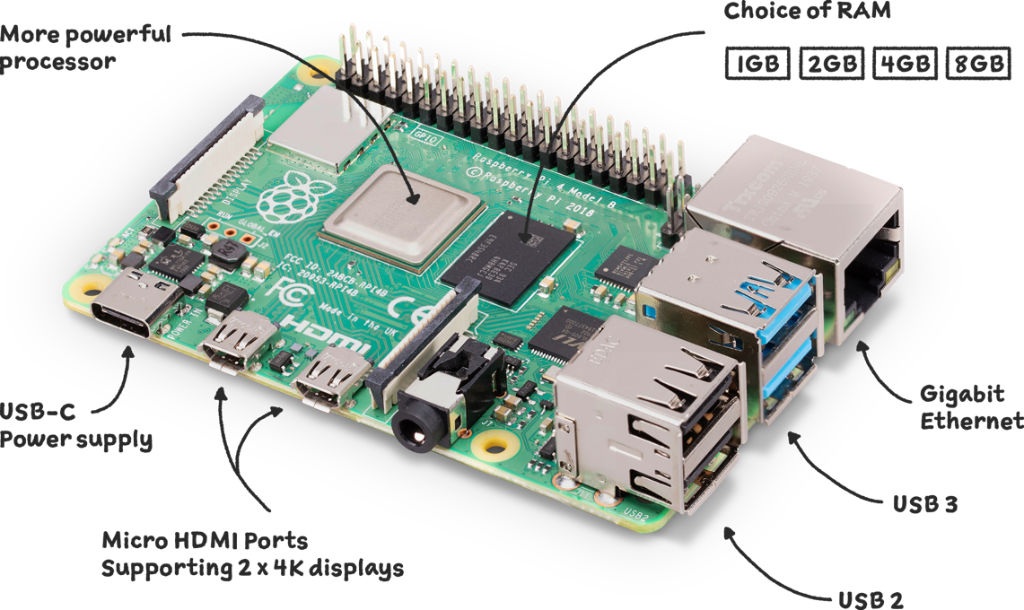
Alternatively, the Raspberry Pi 3 Model B+ is a more budget-friendly option that still offers solid performance with a 1.4 GHz quad-core ARM Cortex-A53 processor and built-in Wi-Fi and Bluetooth. Both models are well-suited for creating a robust and efficient smart home hub.
Essential Accessories
- MicroSD card.
- Power supply.
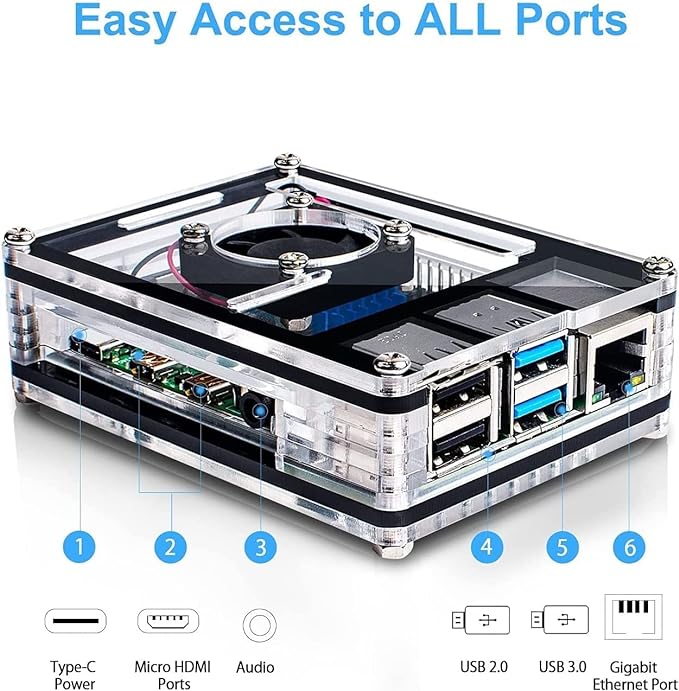
- Case for Raspberry Pi.
- HDMI cable and display, keyboard and mouse (for initial setup)
Additional Components
- USB Zigbee/Z-Wave dongle (for connectivity with various smart devices).
- Ethernet cable or Wi-Fi adapter (for Internet connectivity).
- You can also get a case for your Raspberry Pi to keep the components safe and ports easily accessible.
Choosing Your Smart Home Platform
When setting up your DIY smart home hub with a Raspberry Pi, one of the most important decisions you’ll make is choosing the right platform for automation. The three most popular open-source platforms for creating a smart home hub are:
- Home Assistant (most flexible, best community support) – used in this article
- OpenHAB (powerful but steeper learning curve)
- Domoticz (lightweight option for simpler automation)
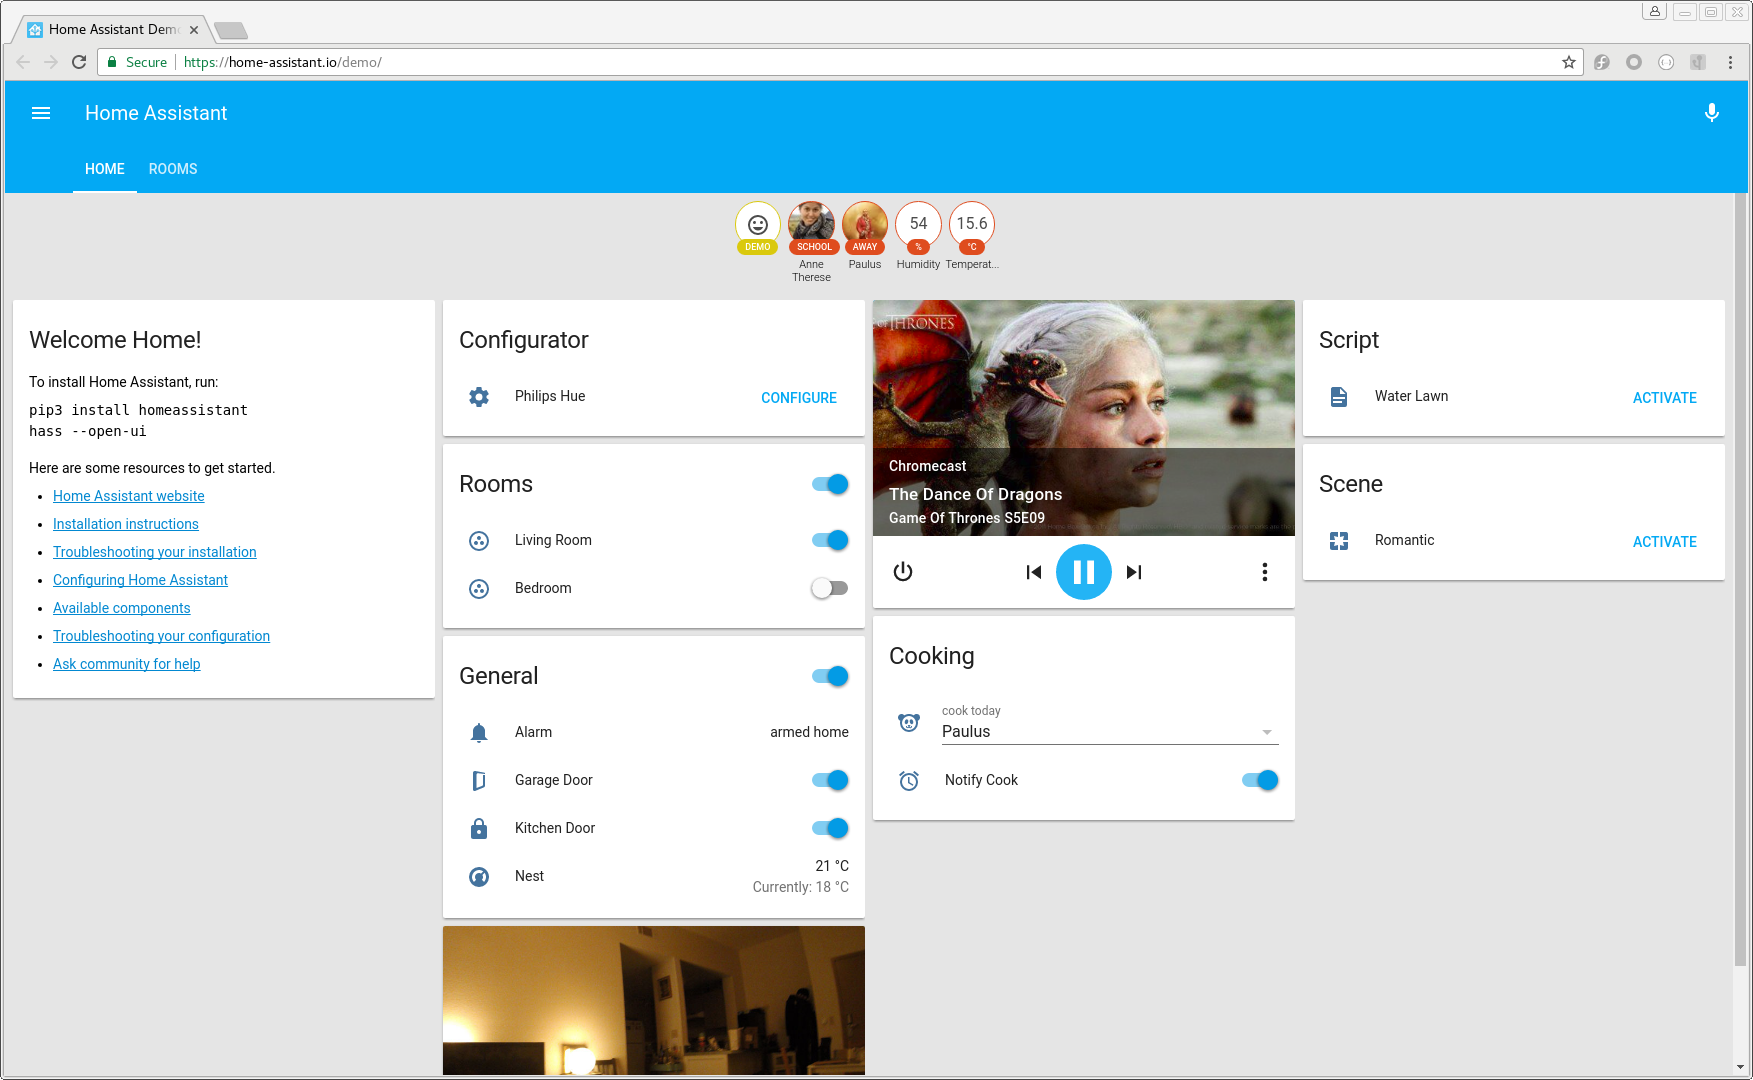
Home Assistant is widely regarded as the most flexible and user-friendly option. It has extensive community support, and its ability to integrate with almost every smart device makes it a top choice for enthusiasts. Home Assistant uses a web-based interface that is intuitive, and it offers powerful automation capabilities through both graphical and YAML-based configurations. For beginners and advanced users alike, Home Assistant provides a scalable, customizable solution for almost any home automation need.
OpenHAB, on the other hand, is slightly more complex but offers a more robust and feature-rich experience. It has a steeper learning curve but is ideal for those who want fine-grained control over their system and are willing to dive deeper into configurations. OpenHAB supports a wide range of protocols and devices, making it a powerful option for those looking to build a more intricate, professional-grade smart home system.
Domoticz is the lightweight contender, perfect for those who want a simple and efficient solution without all the bells and whistles. It’s less demanding on system resources and is a great choice for smaller smart home setups or users who don’t need advanced features. While it lacks the community size and the vast array of plugins that Home Assistant offers, it’s still a solid platform for basic automations and integration with smart devices.
Ultimately, the choice between these platforms depends on your level of expertise and the complexity of your smart home needs. If you’re just starting out, Home Assistant is likely your best bet.
Setting Up Raspberry Pi for Your Smart Home Hub
1. Installing Raspberry Pi OS or a dedicated smart home OS
Before staring the installation of your chosen smart home software, you’ll first need to get your Raspberry Pi set up and ready for action. Start by installing a Raspberry Pi OS or a dedicated smart home OS, depending on your platform of choice. For most users, Raspberry Pi OS (formerly Raspbian) is a good starting point, offering a versatile and stable base for your projects. Alternatively, platforms like Home Assistant OS come pre-configured and make setup easier if you’re specifically using Home Assistant. For our purpose, we will focus on Home Assistant OS so read this section in conjunction with the section below to install Home Assistant OS.
2. Flashing the OS onto a microSD card (using Raspberry Pi Imager or Balena Etcher)
To install the operating system, begin by flashing it onto a microSD card using tools like the Raspberry Pi Imager or Balena Etcher. Simply select the OS you want, and the software will guide you through the process. The next step is inserting the microSD card into the Raspberry Pi and powering it up. Once powered on, connect your Pi to a monitor, keyboard, and mouse for the initial setup.
3. Initial boot and basic configuration (Wi-Fi, SSH, static IP)
After booting up, you’ll need to perform some basic configuration, such as setting up your Wi-Fi (or Ethernet) connection, updating the OS, and adjusting some network settings. It’s advisable to set a static IP address for your Raspberry Pi to ensure a stable connection with your smart home hub. You can do this through the raspi-config utility or by editing the network configuration files. Additionally, enabling SSH (Secure Shell) allows you to manage your Raspberry Pi remotely, which is essential for managing your smart home hub from other devices.
Once these basics are in place, you’re ready to proceed with installing your chosen smart home platform, but having your Raspberry Pi properly configured beforehand ensures a smoother setup and a more reliable hub in the long run.
Installing Your Chosen Smart Home Software – Home Assistant OS
For this article, we focus on Home Assistant on Raspberry Pi. Installing Home Assistant on your Raspberry Pi is straightforward, especially if you’re using a dedicated OS designed for this purpose. This section will guide you through the step-by-step process of getting Home Assistant up and running on your Pi.
Step 1: Flashing Home Assistant OS
The easiest way to install Home Assistant is to use Home Assistant OS, which is a dedicated operating system designed specifically for running Home Assistant. Start by downloading the Home Assistant OS image from the official website. Once downloaded, use a tool like Raspberry Pi Imager or Balena Etcher to flash the Home Assistant image onto your microSD card. Make sure the microSD card has at least 32 GB of storage for optimal performance.
Step 2: Setting Up the Raspberry Pi
Once the image is flashed, insert the microSD card into your Raspberry Pi and connect the necessary peripherals: a monitor, keyboard, and mouse. After powering on the Pi, it will begin booting into Home Assistant. The first boot may take a few minutes as Home Assistant OS will set up the necessary system configurations.
Step 3: Accessing Home Assistant
After the system has booted up, you can access Home Assistant through a web browser. On a local network, simply enter the IP address of your Raspberry Pi followed by :8123 (e.g., http://192.168.1.100:8123). If you’re unsure of the IP address, you can use your router’s device list or a network scanning tool to find it. The first time you access Home Assistant, you will be prompted to create an account with a username and password.
Step 4: Adding Devices to Home Assistant
Home Assistant offers an easy-to-use interface for adding devices, whether they are smart bulbs, thermostats, or sensors. Once logged in, you’ll be guided through an onboarding process that helps detect and add compatible devices on your network. Home Assistant supports a wide range of protocols such as Zigbee, Z-Wave, and Wi-Fi.
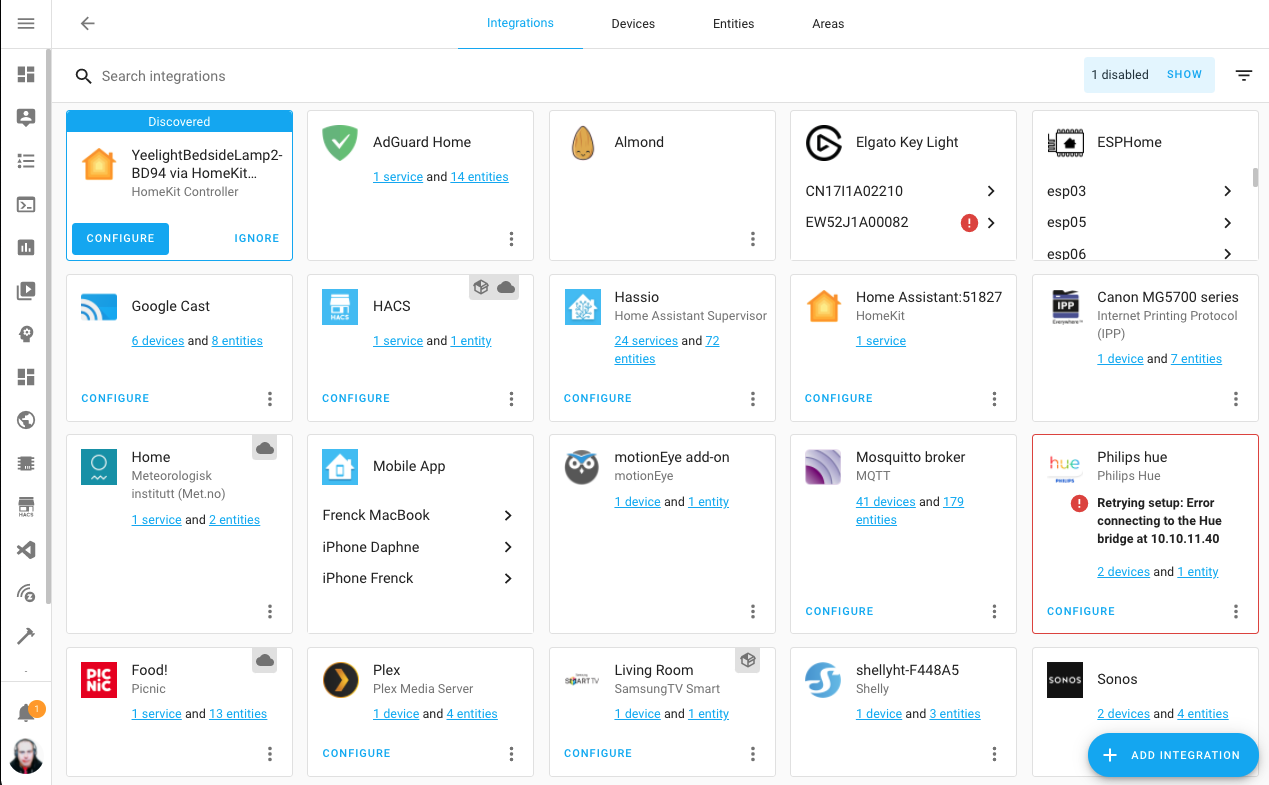
To add a device manually, navigate to the Configuration section from the sidebar, then click on Integrations. Here, you’ll find a list of available integrations. Select the integration for your device (e.g., Philips Hue for smart bulbs, Nest for thermostats, etc.), follow the prompts to connect the device, and it will be added to your system.
Some devices may require additional configuration or a bridge (e.g., Zigbee or Z-Wave hubs).
Step 5: Managing Devices
Once your devices are added, you can easily manage them from the Home Assistant dashboard. To control a device, click on its icon or entry within the dashboard. Here, you can toggle lights, adjust temperature settings, or monitor sensor data. For more complex devices, you might need to configure specific settings through the Configuration menu.
If you want to organise your devices, you can assign them to areas (e.g., living room, kitchen, etc.) or create groups for more convenient control. To do this, head to the Configuration menu and select Areas or Groups, where you can set up and customize your device organization.
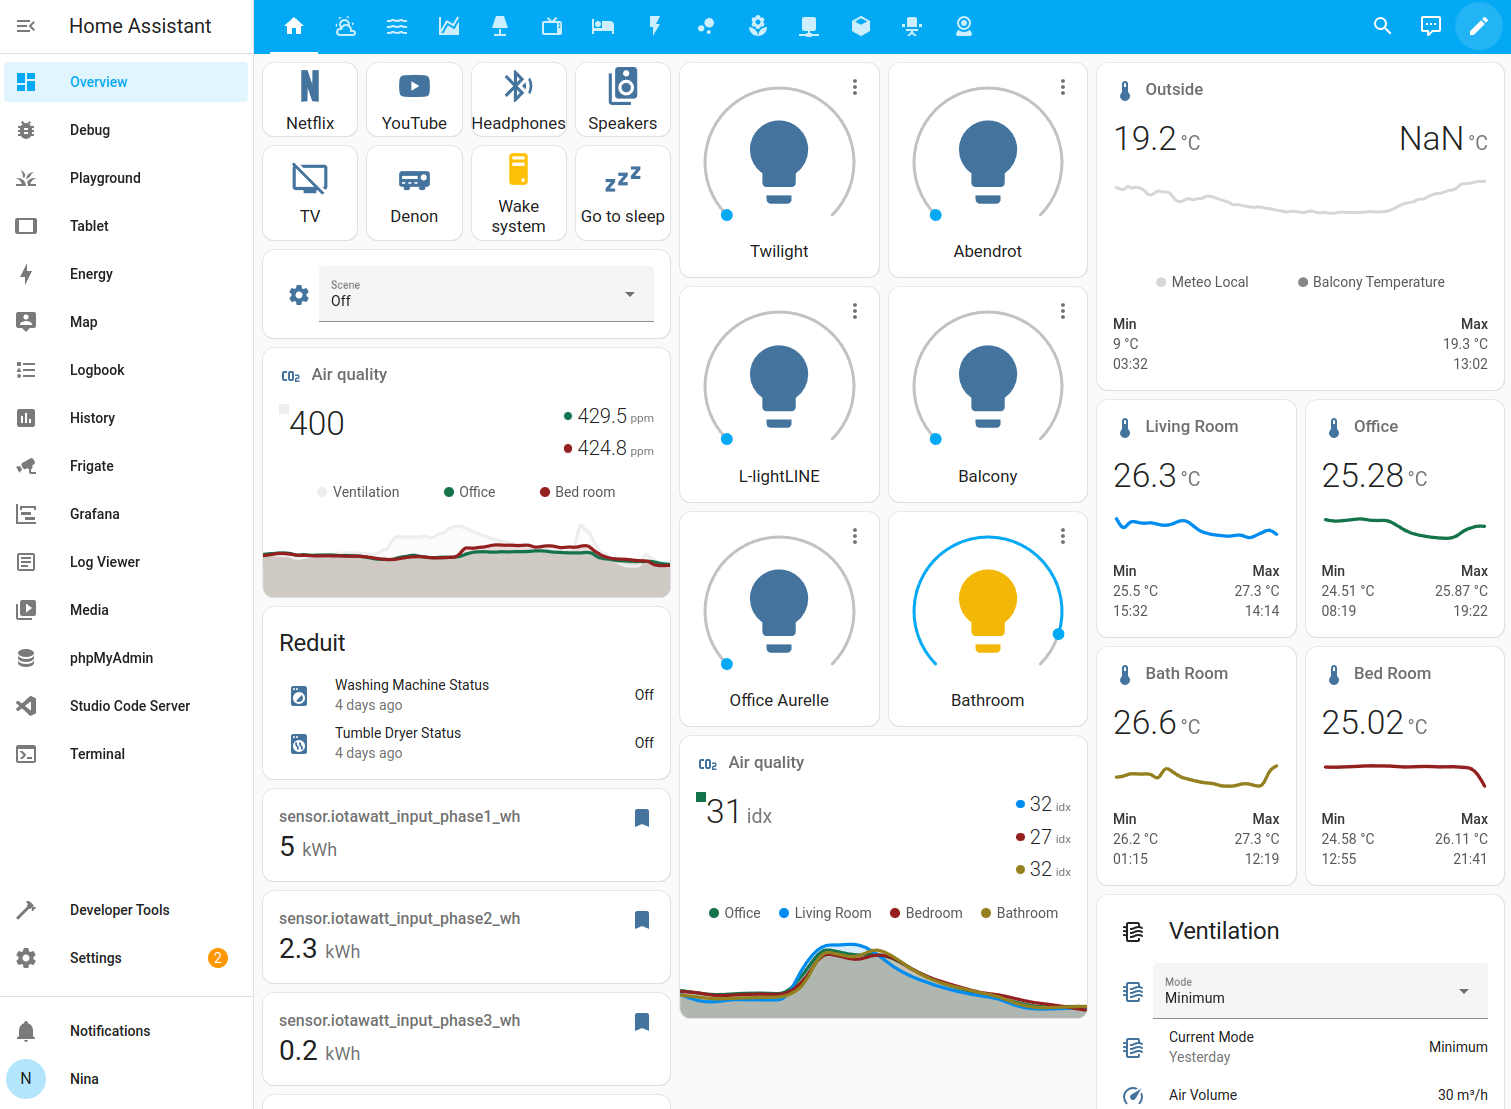
Step 6: Setting Up Dashboards and Controls
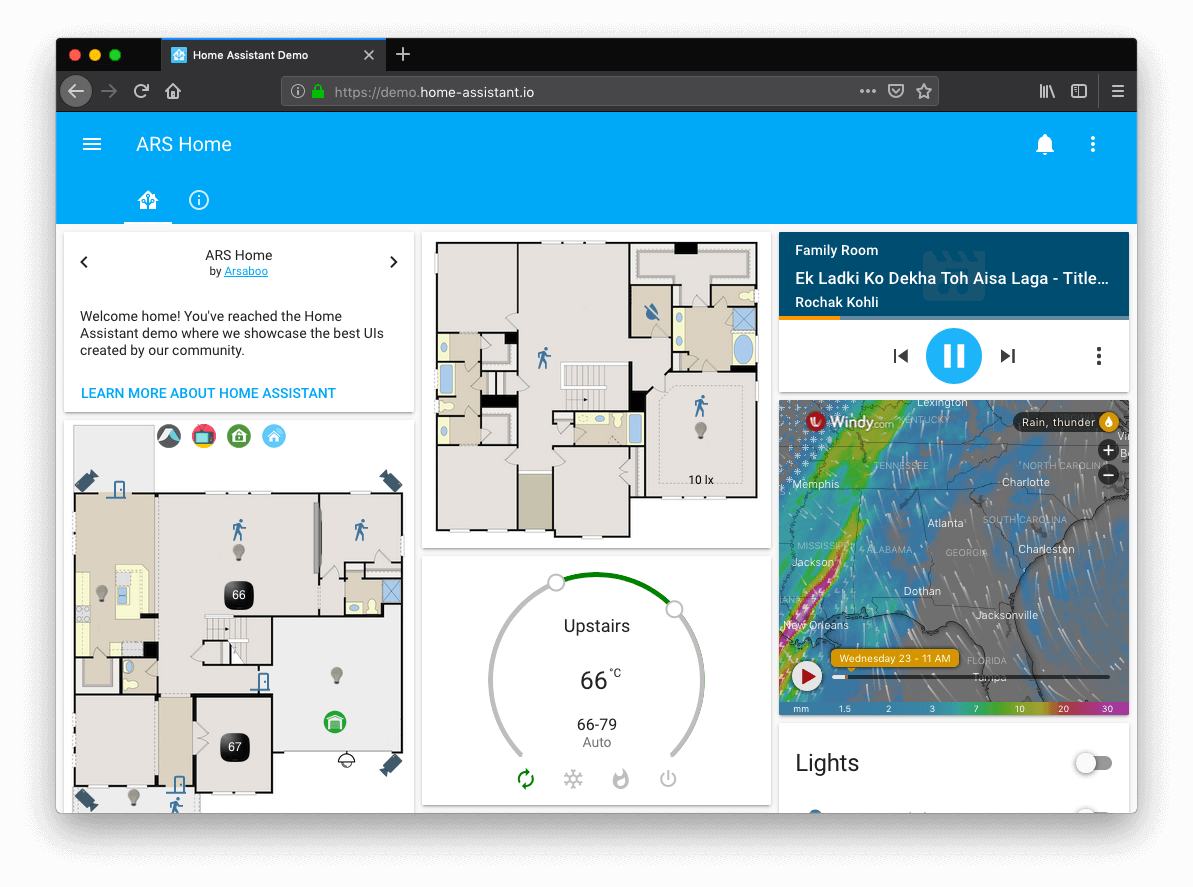
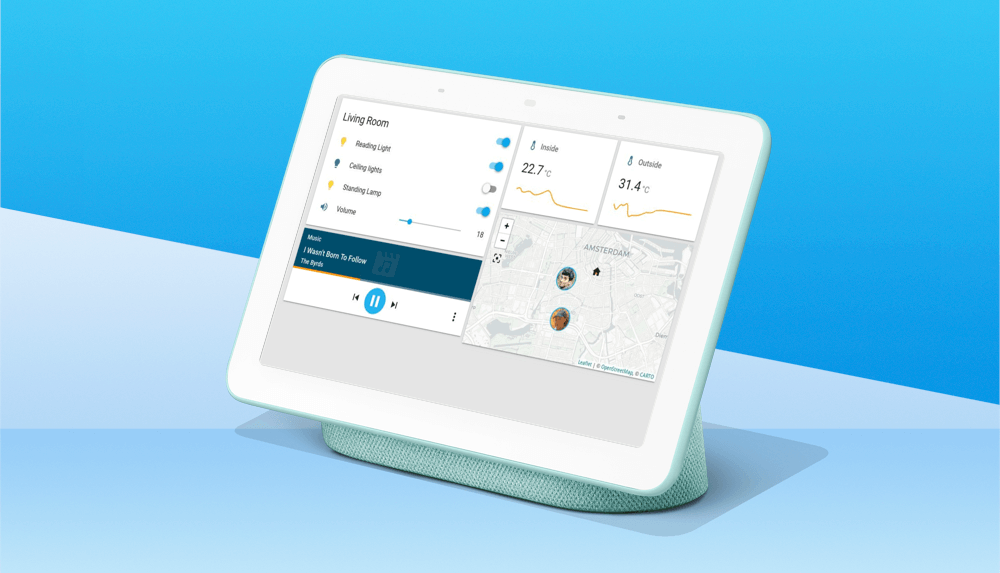
Home Assistant’s interface is customisable, allowing you to create personalized dashboards to easily control your smart home. The main dashboard, Lovelace, is highly configurable, allowing you to add different views for specific devices or rooms. To create or modify your dashboard, click on the Overview tab and select Edit Dashboard. From here, you can add cards (such as light controls, thermostat sliders, or camera feeds), arrange them according to your preference, and even choose themes to match your style.
You can also create multiple dashboards for different users or purposes. For example, you might want a separate dashboard for automation controls or one for monitoring security cameras. Once your dashboard is set up, you can access it from any device connected to your network, or remotely if you’ve configured Home Assistant Cloud or VPN access.
Automations and Scenes
Automations and Scenes are the backbone of a smart home system, providing you with the ability to create customised workflows and mood settings for your devices. With Home Assistant, setting up these features is both easy and powerful.
Creating Automations
Automations allow you to trigger actions based on specific conditions. For example, you can set up an automation to turn on the lights when the sun sets. Here’s how to do it:
- Go to Configuration > Automations & Scenes in the Home Assistant interface.
- Click on Add Automation and choose the Start with an empty automation option.
- In the Triggers section, select the trigger type (e.g., Sunset) and adjust the timing if necessary.
- In the Actions section, select what action should occur (e.g., turn on lights).
- Save the automation and enable it.
Automations can be set up to react to a wide range of triggers, including motion sensors, time of day, or even external conditions like weather.
Setting Up Scenes
Scenes allow you to set multiple devices to specific states with a single action. For example, you can create a movie night mode that dims the lights, closes the curtains, and turns on the TV. Here’s how to create a scene:
- Go to Configuration > Automations & Scenes and click on Add Scene.
- Select the devices and set their states (e.g., dim lights to 30%, turn on TV, close blinds).
- Save the scene and activate it from your dashboard, or automate it based on a schedule or trigger.
Scenes are perfect for controlling multiple devices at once with a single click, making your smart home experience more seamless.
Enhancing Your Smart Home Hub
Voice Control Integration
Voice control is a great way to enhance your smart home, allowing you to control devices hands-free. Home Assistant integrates seamlessly with both Google Assistant and Amazon Alexa, giving you the flexibility to use either ecosystem.
Setting up Google Assistant:
- In Home Assistant, go to Configuration > Home Assistant Cloud (requires Nabu Casa subscription) or use the manual setup with Google Actions.
- Follow the steps to link Home Assistant to your Google account.
- Once linked, you can control your devices with voice commands like “Hey Google, turn off the living room lights.”
Setting up Amazon Alexa:
- Go to Configuration > Integrations and add the Alexa Smart Home integration.
- Sign in to your Amazon account, and Home Assistant will sync your devices with Alexa.
- Once synced, you can use voice commands like “Alexa, set the thermostat to 70°F.”
Voice Command Configuration
Once you’ve integrated your voice assistant, you can customize voice commands through Home Assistant’s automation and script options. For instance, you can create a custom command to set your thermostat, turn off lights, or activate a scene with a single phrase.
Remote Access and Security
One of the most powerful features of Home Assistant is the ability to access your smart home remotely. You can be at work or on vacation, you can monitor and control your devices from anywhere. However, securing this access is essential.
Secure Remote Access Setup
To enable remote access securely, you can use Home Assistant Cloud (Nabu Casa) for easy, encrypted access without opening ports on your router. Alternatively, set up a VPN or use DuckDNS for remote access via a secure connection. Here’s a quick guide:
- Nabu Casa: Go to Configuration > Home Assistant Cloud and sign up for the service. This will enable secure remote access and support integrations with Google Assistant and Alexa.
- DuckDNS + SSL: Use a free DuckDNS domain to access your Home Assistant instance remotely and configure Let’s Encrypt to secure the connection with an SSL certificate.
Ensuring Data Security and Privacy
To ensure your data is secure, always use HTTPS for remote access. This prevents your sensitive data from being exposed over the internet. In addition, enable two-factor authentication (2FA) for your Home Assistant account to add an extra layer of security. Regularly update Home Assistant and its components to avoid vulnerabilities, and carefully review integrations and permissions to ensure your devices are not unnecessarily exposed.
Final Thoughts
With Home Assistant running on your Raspberry Pi, you have full control over your smart home, from automations and scenes to voice control and remote access. The platform’s flexibility and extensibility allow you to customise your system to suit your needs; to create complex automations or simple scenes for daily routines. As your needs grow, Home Assistant can scale, offering support for new devices, integrations, and advanced features.
By taking the time to secure your setup and explore voice control, you’ll have a truly smart and personalized home that adapts to your lifestyle. Happy automating!